User Guide
Welcome to the mgm Q12-TMT User Guide.
This Guide is designed to empower both - newcomer and seasoned users - with the Q12-TMT features to streamline your testing processes. From setting up your Project to creating reports of the test results, you will find all details of how the aspects of your test management are covered to ensure smooth operation and maximum effectiveness.
The User Guide is structured to give some short insights first for a quick start and then leads you through the main menu of Q12-TMT. For information about the administration settings, please have a look into the Administration documentation.
See our video tutorials on our YouTube Channel.
Getting Started
Login
Sign in to Q12-TMT with your username or your email address.

In order to use Q12-TMT, ensure you have an active user account and appropriate project permissions. To obtain these permissions, please request the administrator.
Wrong Password
If you enter a wrong password ten times in a row, you will be locked from trying again for a duration which increases further with each subsequent failed attempt.
To unlock your account, please reach out to the IT administrator.
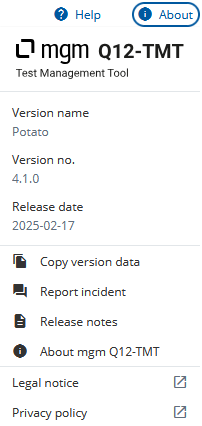
Help und About
With a click on the “Help” button, a dropdown menu is displayed. From this menu, users can open the user manual or start the guided tour.
With a click on the “Info” button, a dropdown menu is displayed. In this menu, information about the Version is shown. Through the menu, issues can be reported, and the release notes, user terms, legal notice, and privacy policy can be opened.
Guide Tour
At a user's first login, the tour starts automatically. The tour is an interactive walkthrough of the main features in Q12-TMT. After the tour has been completed, it can be started again via the “Start Tour” button.
Profile
User Profile
Click on the User button in the top right corner to find your profile information and the logout.

The Profile provides information about your account.
- Avatar
- Given Name
- Family Name
- Username (unchangeable)
- Email (unchangeable)
You can edit them with a click on the \“Edit\” button in the toolbar.
Change Password
You can change your password in your user profile. To do so, follow the steps below:
- Click on \“Change password\” in the Edit Mode
- Stay logged in
- You receive an email from Q12-TMT with a link
- Click on the link to change you password
- Log in with your new password
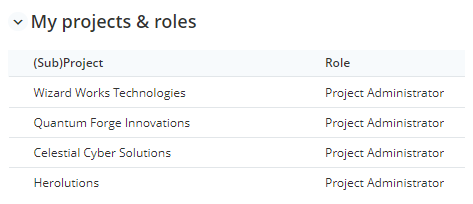
Projects & Roles
Users are assigned to roles that come with various privileges and permissions. To review your assigned roles, navigate to the \“My Projects & Roles\” section in your profile information.
Information about permissions can be found in chapter “User roles and Permission”.
To assign a user to a role, delete a user, or change the password of a user, administrative access rights are needed.
Projects
Click on a Project in the dashboard to open it, and you will be redirected to the latest Version of the (Sub)Project. Alternatively, you can open a Project via the project structure, a list of all Projects and Subprojects assigned to you. You can access the project structure via the main menu or the “My Projects” button on the dashboard. If you want to make changes in a different Version, open the (Sub)Project via the Version overview.
If the Project is not in the list, please contact the IT administrator to provide the corresponding permissions.
Navigation
After the selection of a (Sub)Project, Q12-TMT will initially show you the Test Suites list of the selected (Sub)Project. You can now navigate through the sidebar on the left side.
- Search: Search Test Cases, Folder, Test Suites, Test Execution and Test Runs
- Pin board: List of all pinned objects in the Project (Test Suites, Test Cases, etc.)
- Project: Details about the currently selected Project and Version
- Test Suites: List of all Test Suites in the Project
- Test Runs: List of all Test Runs in the Project
- My Tasks: All Test Cases the user is assigned to maintain or test
- Risk Based Testing: Overview of the risk of all Test Cases in the Project
- Versions: All Versions of the currently opened Project
Practical Features
Tickets
In Q12-TMT, it is possible to add tickets as sources in Test Cases or for defect documentation in Test Runs, for example. These maintained details are also used for further displays in the dashboard or for risk calculation in the “Risk-Based Testing” area. The Jira ticket data is fetched every hour in Q12-TMT.
The tenant admin needs to configure one instance of a ticket system e.g. Atlassian Jira or Azure DevOps in Q12-TMT. The connected instance can then be used throughout Q12-TMT or for specific (Sub)Projects.
Status change and impact
Different statuses can be assigned for Versions, Test Cases (Test Case status and test automation), and Test Runs. Changes in the status of a Version or Test Run affect other business objects and calculations.
Change the status of a Version
A Version can have the status “Open” or “Closed”.
In an open Version, all business objects (Test Suite, Test Case, or Test Run) of the (Sub-)Project can be created, edited, or deleted.
When the status is set to “Closed”, all saved states are frozen. Changes are no longer possible. Further information can be found in chapter “Versions”.
Change the status of a Test Cases
The status of a Test Case does not impact other objects, calculations, or processes. It is displayed in various views and serves as a tool for the workflow. If a Test Case is assigned to a user as the person responsible and its status is not “Completed”, it will be displayed in the “My Tasks” section. Once the Test Case is set to the “Completed” status, it is removed from this section.
Change the status of a Test Runs
A Test Run can have the status “Open”, “In Progress”, or “Closed”.
Setting the status to “In Progress” freezes the risk values of the Test Cases within the Test Run, which are then used for the risk burndown diagram. Adding and removing Test Suites and Test Cases is still possible.
When the status is set to “Closed”, all saved states are frozen. Changes are no longer possible. Further information can be found in the chapter “Test Run – Overview”.
Shortcuts
Q12-TMT supports multiple keyboard and mouse controls. Besides \“Ctrl/Cmd + S\”, which saves the current state of objects, Q12-TMT shortcuts do not interfere with common browser controls.
| Shortcut | Result |
|---|---|
| E | Enter edit mode of a form |
| Ctrl/Cmd + S | Save form |
| T | Create a Test Case in an opened Test Suite |
| F | Create a folder in an opened Test Suite |
| A | Enter / Exit the “arrange” mode of a Test Suite or Test Run |
| B | Toggle Bulk operations on/off |
| J | Opens the next Test Case, a Test Suite or Test Run, in the detailed view |
| K | Opens the previous Test Case, a Test Suite or Test Run, in the detailed view |
| Tab / Shift + Tab | Navigates through Q12-TMT |
| ↑ , ↓ | Navigates through lists and sidebar |
| Enter | Open and close a function in the toolbar Open objects, e.g. Test Case in a list activates sortable table headers |
| Space | Open and close a function in the toolbar Checkboxes can be de- and activated |
| Esc | Close a modal |
| Ctrl/Cmd + | Open table/tree entry in new browser tab |
| Open table/tree entry in new browser tab |
Rich Text Editor
Input fields and Text boxes in Q12-TMT provide a variety of text formatting options, as well as the possibility to insert images and files.
This includes:
- italic and bold text
- strikethrough in text
- text colors
- horizontal lines
- blockquote
- enumeration with and without numbering
- indentation and outdentation of lines
- tables
- insert an attachment from the “Attachments” area
- insert graphics as a file or URl
- links
- code spans
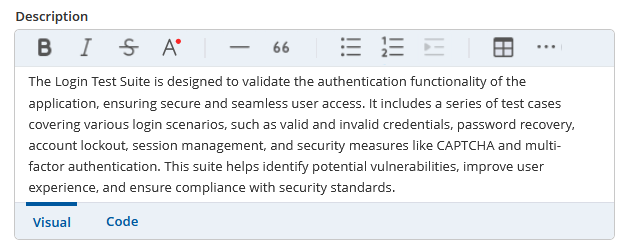
Formatting text is simplified by the distinction of two text box tabs:
- The Visual view presents the text as it is seen in Q12-TMT with all selected formatting options applied.
- The Code view presents the plain text with the tags that produce the corresponding outcome of the visual view. It can be used to quickly format your text without the need of clicking a button.
If another user already edits an object in Q12-TMT, e.g. a Test Case, a message will appear in the top, informing the user that the object currently is locked. After applying the changes, the edit mode can be closed by clicking the Tab key.
Deep Linking
Q12-TMT saves Test Cases, Test Suites, and Test Runs in a hierarchical link structure using object IDs in the format
https://[your-tenant-subdomain].q12-tmt.com/p/241/sp/_/v/1.0.0/s/9/c/17
This allows to reopen the same specific object from a different environment by copying the link. Additionally, this structure permits quick navigation among overviews of varying Projects or Versions, by simply replacing the corresponding number in the link. By this you can quickly switch between i.e. the latest Version and older ones:
https://[your-tenant-subdomain].q12-tmt.com/p/241/sp/_/v/latest/s/9/c/17
https://[your-tenant-subdomain].q12-tmt.com/p/241/sp/_/v/2.1.0/s/9/c/17
Q12-TMT automatically creates links to Folders, Test Suites, Test Runs and Test Cases if the corresponding ID is written in square brackets (e.g. [C_2]). ID and title of the currently opened object, e.g. a Test Case, are displayed in the browser tab, simplifying the simultaneous usage of multiple tabs.
Filter
Lists for extensive Projects can be very large. To quickly find the desired object, these can be narrowed down using the filter.
The filter is opened by clicking on the Filter icon ![]() on the right-hand side of the toolbar.
Filters are already available in the filter bar for some lists.
on the right-hand side of the toolbar.
Filters are already available in the filter bar for some lists.
- Filter Selector: The options available in the filter selector differ depending on the list. Filters already available in the toolbar are preselected and deactivated. One or more selectors can be used.
- Filter Options: Depending on the selected selector, an input field, checkboxes or radio buttons appear. Multiple selections are possible for checkboxes.
- Filter Operation: Where relevant, click the Operation icon
 and choose “Or” or “And”.
Click the “Apply” button to close the filter and filter the list. All selected filter selectors appear between the toolbar and the list. By clicking on them, the set options can be changed or the filter can be removed using the X. Selectors without a filled filter option are inactive for the filter process.
Bulk operation
In order to simplify and accelerate iterative processing, for example the assignment of Test Cases, Bulk Operation is possible for many lists. If this function is available, it is mentioned in the corresponding chapter.
The function is activated by clicking on the bulk operation icon ![]() and closed by clicking again on the icon without saving.
and closed by clicking again on the icon without saving.
If the function is activated, a number appears next to the icon and the processing options next to it. Select the relevant editing process in the dropdown and make your selection in the dropdown that then opens. If a field can be empty, the “Remove” button is visible and active. Any other selection is confirmed with the “Set” button. Some edits are triggered by clicking on a button.
Checkboxes for selecting the individual objects appear at the start of the row. The checkbox in the column header can be used to select or deselect all objects.
At least one checkbox must be activated in order to trigger the selected processing. Afterward the process starts. A message in the top right-hand area informs about the start and end of the background process. If one or more objects are locked, processing is not carried out for them and is displayed in a corresponding message.
Arrange
Initially, all lists are sorted alphanumerically. An individual order of objects is defined by using the Arrange function. This removes the initial sorting. Newly created objects then always appear at the end of the list and must be sorted manually. For the Test Suites, it is possible to reset the order to the initial state.
Test Cases, folders and suites can be arranged at any time. If the objects are part of an open Test Run, the changes are taken over.
The arrange button ![]() opens the mode for moving the objects.
opens the mode for moving the objects.
The objects can be moved within the list using drag and drop or cut and paste. Cutting is only possible for single objects. Moving several objects at the same time is done by Bulk operation and drag and drop. Moving across several pages is only possible by cutting and pasting.
Test Cases can be moved from one folder to another folder or above or below it. The insertion of a cut object can be canceled by pressing the Esc button or via the “Cancel” button.
The mode closes and saves all changes when the “Exit arranging” button is clicked or another page is opened.
Attachments
In Projects, Test Suites, Test Cases, and Test Runs, it is possible to save files as attachments and insert them into text fields using the rich text editor. It is also possible to upload and use files directly within the rich text editor.
Rich Text Editor
To add files, click the “Insert image” or “Insert attachment” icons of the rich text editor and click “Choose a file”. You can now select one or more files from your local machine. Alternatively, you can drag and drop files directly into the designated text field.
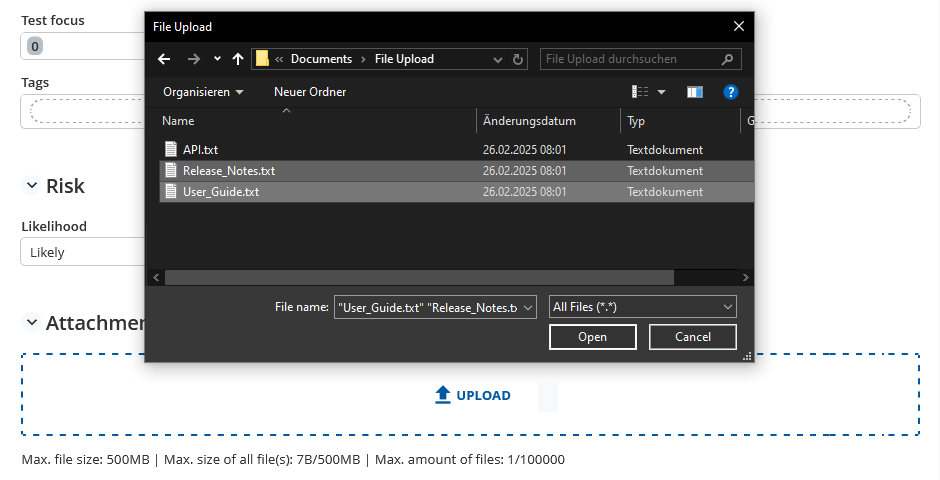
“Attachments” section
After clicking the “Upload” button ![]() , one or more files from the local computer can be selected and uploaded in the window that opens. Alternatively, files can also be dragged and dropped directly into the designated attachment area.
, one or more files from the local computer can be selected and uploaded in the window that opens. Alternatively, files can also be dragged and dropped directly into the designated attachment area.
Added attachments are listed in the table with a preview (for image) or a type symbol, file name, upload date and the user responsible for the upload. The “Referenced” column gives an information whether the attachment is in use or not in a text field.
All columns of the attachment list are sortable by clicking on the corresponding header. At the end of each row, there are two icons to download and delete the file. Please note that attachments can only be removed in the Edit Mode.
Locking
To maintain consistency and prevent conflicts, Q12-TMT locks Test Suites, Test Cases, and other objects when they are being worked on. Only one user can edit, move, or rearrange an object at a time. These functions will be restricted for all other users during this period. Deleting a locked object is also not possible.
If an operation cannot be completed because the Test Cases are locked, an info message will appear at the top of the screen. Additional details about the lock can be viewed by hovering the lock symbol.
Metadata
Metadata are structured data that give basic information about objects (e.g. a Test Case). They are especially useful to filter certain sets of data, e.g. all Test Cases of a specific user or all Test Cases which have been executed in the past week.
Metadata exist for multiple objects in Q12-TMT, including:
- Projects
- Subprojects
- Test Suites
- Test Cases
- Test Runs
The metadata provide information about
- when the object was created or last edited
- by whom the object was created or edited
- version information
- the last test execution of a Test Case
Dashboard
The Dashboard is the first view that opens after logging in. This can be reopened at any time via the main menu or by clicking on the mgm Q12-TMT logo.
At a user's first login, a guided tour starts automatically. The tour is an interactive walkthrough of the main features in Q12-TMT.
Different user-specific information are displayed on the board, depending on the selected Projects, Subprojects and their Version.
They contain:
- key figures
- open tasks in the Project without agents
- open tasks in Test Runs in the Project without testers
- key figures for the displayed Test Runs
- open own tasks in the Project
- open own tasks in Test Runs in the Project
- a list that includes all Test Runs– regardless of their state - with visualized progress
- a number of stored tickets with their priority
- a list of all Test Cases assigned to you and not yet completed
Note: The “Tickets” area is only displayed if a connection to ticket system e.g. Atlassian Jira or Azure DevOps is configured and access is permitted.
Single Test Runs can be opened in separate tabs or a list of all Test Runs can be opened via the link at the end of the list.
If errors occurred during the test execution and are stored with a ticket in the “Tickets” field, the number of tickets is displayed in total for all Test Runs. There is also a classification into four groups. Please note that the system does not differentiate between the ticket type (bug or requirement). A list of all tickets is opened via the link at the end of the section.
| Q12-TMT Classification | Jira Ticket priority |
|---|---|
| “Blocker” | Blocker |
| “Critical” | Critical and Highest |
| “Major” | Major and High |
| “Normal und below” | Medium, Normal, Low and Minor |
The Test Cases in the “My tasks” area also open in separate tabs after a click.
The (Sub)Projects and Versions are selected in the filter, which is opened by clicking on the “Projects” button at the top right. All Projects and Subprojects assigned to you are listed in the filter. You can select and deselect them by using the checkbox at the beginning of the line. The currently selected Version is displayed after the (Sub-)Project name. By clicking on the version icon at the end of the row, a list of all Versions of the (Sub-)Project opens. You can select either a specific Version or the “Always the latest” option. For newly assigned or created (Sub-)Projects, the latest Version is always displayed.
On the dashboard, you can see the title of the selected Projects and the number of possible Subprojects and the selected Version. If only Subprojects are selected, these are displayed. If two or more Projects are selected, the Subprojects are not displayed separately. Please note that only two Projects are displayed on small screens. On larger screens, there are 4-5 in addition to the “My Projects” button.
Clicking on a Project field opens the Test Suite overview for the selected Version in a new tab. The “My Projects” button opens a list of all Projects and Subprojects assigned to you, also in a new tab. You can find more information about this view here
Search
Q12-TMT provides a powerful search with the possibility to further filter your search results so that you can quickly locate Test Suites, Folders, Test Cases, Test Runs, Test Case in Run of the currently selected Version.
To begin a search, click the Search icon ![]() in the sidebar.
in the sidebar.
Enter the string you want to search for. Select the type of object. Choose where to search. Click the “Search” button or press “Enter”.
- Search: the string requires at least 3 characters (except when searching only for “ID”, which requires at least 2 characters). It can be a substring or multiple strings. The search is not case-sensitive.
For example, searching for “log” returns content containing “log,” “login,” or “analogous”.
Searching with multiple strings like “check out” returns content with “check” and “out”, but not content with only “check” or “out”. - What: Select the type of object you are searching for: Test Suites, Folders, Test Cases, Test Runs, Test Cases in Run.
- Where: Choose the field to search in: “All fields”, “ID”, “Title”, “Description”, etc.
For example, search for “C_189” in “Test Case” on “ID”, or to find a Test Case associated with a specific requirement, search for the ticket number in “Test Case” on “All fields.”
In the search results, Q12-TMT lists all matching objects in the currently selected Version.
Depending on the selected object of search, different additional functions are available. All possible functions are described below.
Toolbar:
- print: Create a PDF of the search results list.
- create run: Create a Test Run with all listed Test Cases. The title of the Test Run is filled automatically and contains the searched string.
- bulk operation: Pin or edit specific parameters all at once.
- filter: Access the filter mask to filter the search results list.
Filter bar:
- Test Suite: Narrow down the listing to the selected Test Suite.
- Assignee: Narrow down the listing to the selected assignee.
- Tester: Narrow down the listing to the selected tester.
- Result: Narrow down the listing to the selected test result.
- List of all other filters used.
For each selectable search result at the end of the row and in the context menu:
- edit object: Open the Test Cases in edit mode.
- execute test: Open the Test Case in Run in execution mode.
- open in new tab: Open the object in a new tab.
- pin object: Pin the object for later use through the pin board.
- print: Create a PDF.
The context menu opens either by clicking on the three dots at the end of the line or by right-clicking on the line of the corresponding Test Case. To prevent concurrent working, some functions may be temporarily locked.
| Function /Search object | Test Case | Folder | Test Suite | Test Case in Run | Test Run |
|---|---|---|---|---|---|
| Filter | ✓ | ✓ | ✓ | ✓ | ✓ |
| Edit | ✓ | ✓ | ✓ | X | ✓ |
| Pin | ✓ | X | ✓ | ✓ | ✓ |
| Open in new Tab | ✓ | ✓ | ✓ | ✓ | ✓ |
| ✓ | X | X | ✓ | X | |
| Execute Test | X | X | X | ✓ | X |
| Bulk operation | ✓ (Assignee, status, pin) | X | ✓ (pin) | ✓ (Tester, overall result, pin) | ✓ (pin) |
The “Create run” button is available in the search result list of Test Cases. After clicking on it, the system creates a new Test Run with all Test Cases of the (filtered) result list. A notification in the top right-hand area informs about the start and end of the background process.
Pin Board
Information about “Pin Board” from 1:20
Test Cases, Test Suites and Test Runs can be pinned for quick access. This can be done by using the ![]() icon in the top right corner of objects.
icon in the top right corner of objects.
In lists like the search results, the pin icon can be found at the end of each object row.
Click on the ![]() icon in the sidebar to access all pinned objects. They are structured by their type. Open a category by clicking on it to get a list of all pinned objects of the corresponding type.
icon in the sidebar to access all pinned objects. They are structured by their type. Open a category by clicking on it to get a list of all pinned objects of the corresponding type.
Project
Overview
The following section shows how to use the Projects tree as a tester or test manager.
Hint: Creating a new Project is only available with further access rights or in the role of an IT administrator. If you were granted such permissions and want to create a new Project, please have a look into the Administration documentation.
Projects are the main business objects to organize and manage your quality assurance work. They are the topmost hierarchical elements that structure Subprojects, Test Suites and Test Runs.
The project structure, a list of all Projects and Subprojects assigned to the user, opens via the main menu “My Projects” or the “My Projects” button on the dashboard. It is organized in a tree structure and can be expanded or collapsed accordingly. This can be done individually for each (Sub)Project or for all via the button at the top right. Depending on the assigned permissions, the following functions are available:
- create a new Project
- create a new Subproject
- view Versions
- edit existing Projects or Subprojects
- adjust settings for Projects or Subprojects
Details
Select a Project to get the details. Initially, the list of all Test Suites will be shown. Click on the ![]() button in the sidebar to navigate to the project details.
button in the sidebar to navigate to the project details.
The display is divided into the sections:
- general with Title, ID and the description of the Project
- attachments of (Sub)Project
- version
- attachments of version
- metadata
The attachments of the (Sub)Project are taken over when a new Version is created.
The “Version” section contains version-specific details, which are entered when the Version was created. In addition, a pie chart is displayed showing the total number of Test Cases and the proportional share of Test Cases for each status (e.g. “In progress” or “Done”).
To determine the risk values for the “Release Scope” category, the stored release version should match to the software release to be tested and should match the Fix Version maintained in the ticket system, e.g. Atlassian Jira or Azure DevOps.
The attachments of the Version are not taken over when a new Version is created.
To edit the project details, click on the “Edit” button in the toolbar. The only mandatory field is the project title.
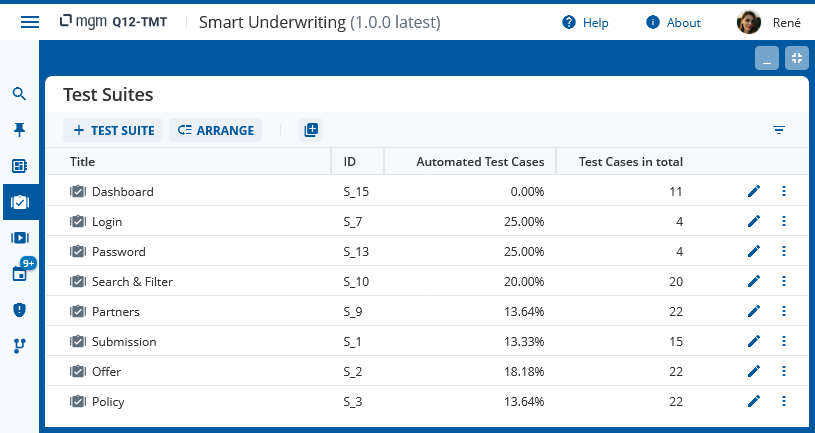
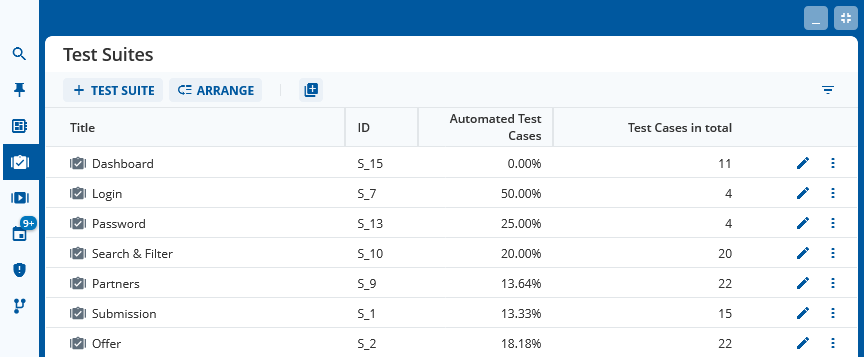
Test Suites
A Test Suite is a collection of Test Cases and provides the hierarchical structuring of Test Cases. Test Suites can be added to Test Runs to execute the contained Test Cases.
Click on the ![]() icon in the sidebar to get a list of all Test Suites in the currently selected Version. Initially they are sorted alphabetically. Use the \“Arrange\” button in the toolbar to change this order.
icon in the sidebar to get a list of all Test Suites in the currently selected Version. Initially they are sorted alphabetically. Use the \“Arrange\” button in the toolbar to change this order.
To create a new Test Suite, click on the \“+ Test Suite\��” button in the toolbar.
To edit, pin, copy or delete Test Suites, use the context menu on the right-hand side or right-click on the corresponding Test Suite. Only Test Suites that are not part of a Test Run and that are not locked can be deleted.
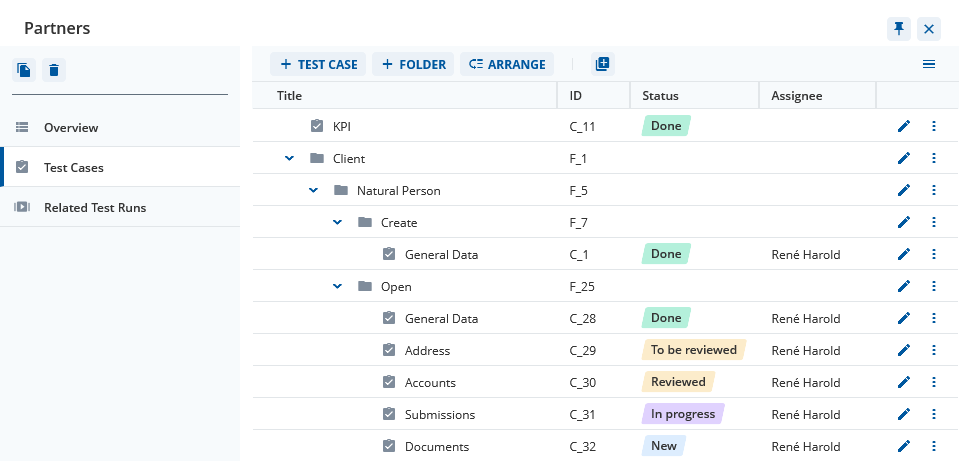
Each Test Suite is separated into three sections:
- Overview: Information about the Test Suite and its content.
- Test Cases: A tree of all folders and Test Cases in the Test Suite.
- Related Test Runs: A list of all Test Runs that the Test Suite is a part of. Even Test Runs of other Versions of the Project are listed here.
When a Test Suite is selected, Q12-TMT automatically navigates to the “Test Cases” section.
Overview
The overview of a Test Suite displays the name, ID, description, and priority. A priority can be selected for each Test Suite, which is initially set to “Medium”. In addition, tags and attachments can be added in the corresponding sections. In the “Internal” section, for example, the user can specify time booking information for the Test Suite. The “Metadata” section contains the corresponding storage and execution data for the Test Suite.
Test Cases
A Test Case is a set of activities (test steps) in a system that intends to verify whether the software runs correctly and whether all requirements are met.
The Test Cases tree groups all the Test Cases which belong to a certain Test Suite. To achieve a hierarchical structure, folders can be used to represent different scenarios.
The following functions are available in the tree structure.
Toolbar:
- + Test Case: Add a new Test Case.
- + Folder: Add a new folder.
- arrange: Adjust the order of the Test Cases and folders.
- bulk operation: Move, copy, or edit specific parameters all at once.
- expand/collapse: Collapse or expand all folders.
All newly created objects added via the toolbar always appear at the end of the list and must be sorted manually.
Context menu for Test Case:
- edit Test Case: Open the Test Cases in edit mode.
- open in new tab: Open the Test Case in a new tab.
- pin Test Case: Pin the Test Case for later use through the pin board.
- print: Create a PDF of the Test Case.
- copy: Copy a Test Case into any Test Suite.
- move: Move a Test Case within the current Test Suite.
- delete: Delete the Test Case from the currently selected Version.
Context menu for Folder:
- edit folder: Open the folder in edit mode.
- open in new Tab: Open the folder in a new tab.
- + Test Case: Add a new Test Case to this folder.
- + Folder: Add a new folder to this folder.
- copy: Copy a folder into any Test Suite.
- move: Move a folder within the current Test Suite.
- delete: Delete the folder from the currently selected Version.
The context menu opens either by clicking on the three dots at the end of the line or by right-clicking on the line of the corresponding Test Case. To prevent concurrent working, some functions may be temporarily locked. Only Test Cases and folders that are neither part of an open Test Run nor locked can be deleted.
Create & Edit
The title and status are mandatory fields in a Test Case.
Optional sections in a Test Case are:
- Test information: Basic information such as status and prioritization for a Test Case. Assignments can only be made for users with access rights for the Project.
- Description: Text box to describe the aim of the Test Case.
- Sources: The sources where the Test Case has been derived from (either a ticket or a document).
- Criteria: Basic parameters which have to be met (e.g. dependencies or browser versions).
- Risk: Risk values for all risk categories for the selected Test Case.
- Attachments: Files can be uploaded here (e.g. a diagram or target state screenshot).
- Preconditions: Shows the circumstances and necessary settings which are required to run the Test Case.
- Test Steps: Collection of small, ordered, and indivisible steps, each consisting of an action and an expected result.
Copy & Move
Copy: Test Cases and folders can be copied at any time. They can be copied to the same or a different Test Suite. The latter can be part of either the same or a different Project or Version.
Move: Test Cases and folders that are not part of an open Test Run and are not locked can be moved. Moving is only possible within the currently selected Version.
Details
Click on a Test Case to get the details. If the Test Case is located in a folder or subfolder, the path is displayed above the toolbar. All fields that could be filled in during creation are displayed. In addition, the “Metadata” section appears. The buttons for pinning, expanding, collapsing, and closing the Test Case are located in the upper right-hand corner.
The toolbar contains the following buttons:
- edit: Open the Test Cases in edit mode.
- print: Create a PDF of the Test Case.
- copy: Copy a Test Case into any Test Suite.
- move: Move a Test Case within the current Test Suite.
- delete: Delete the Test Case from the currently selected Version.
- history: Change to the Test Case in chronological order.
- related Test Runs: Test Runs of all Versions related to the Test Case.
In the details of a Test Case it is possible to print out a Test Case into a single PDF. The resulting file will contain all data of the Test Case, except for its metadata, its attachments, and its general information, e.g. status, type, or automation. The print includes the date and time when it was created.
Clicking on the “Test Run” button opens a list of all Test Runs, both from the currently selected Version and all other Versions where the Test Case was executed. For each entry, the assigned testers, the test result, and any stored tickets are displayed. The context menu can be used to navigate directly to the respective Test Case in the Test Run or to the entire Test Run.
Version Delta
The version delta helps to identify Test Cases that were added or changed in the currently selected Version. When searching for Test Cases, either via Search or inside a Test Run via the Smart-Selection, Test Cases can be filtered for their version delta. This way it is possible to automatically filter for new or changed Test Cases when selecting Test Cases for a Test Run and therefore focus on features that are new or were adapted in comparison to the previous Version.
When a new Test Case is added or an existing Test Case is edited, the Version Delta is automatically set to \“yes\” by default. It can be set to \“yes\” and \“no\” manually as well.
Risk
This section displays all risk levels and risk parameters per risk level for a single Test Case.
The section is divided into four sub-areas:
- overall
- business logic
- test history
- release scope
Overall: Calculated value for all existing risk levels, resulting in an automatic overall evaluation of the risk for a Test Case.
Business Logic: Manual assignment is possible in this section. The toggle is initially set to “Auto” for automatic. If it is set to “Manual”, it is possible to select the occurrence of an error and its impact. Both values can remain empty. Both values are necessary for a calculation of the Business Logic risk. These parameters help to assess how likely a particular scenario is to cause a problem in production and what the potential consequences of such a problem would be.
Test History: The non-editable area shows the risk of a Test Case based on its test history. For more information, see the chapter on Risk Based Testing.
Release Scope: The non-editable area shows the risk depending on the release scope. For more information, see the chapter on Risk Based Testing.
Test Steps
Test steps separate the Test Case into smaller tasks which are executed successively and each consist of an action and an expected result. Use the text boxes to describe them in any detail. Each test step can later be marked with a test result separately.
More test steps can be added with the \“Add\” button below. The two arrows next to the test steps allow to rearrange the order of the test steps. The context menu lets you insert a new test step above or below as well or copy/delete the test step. The position of test steps can be changed with drag and drop.
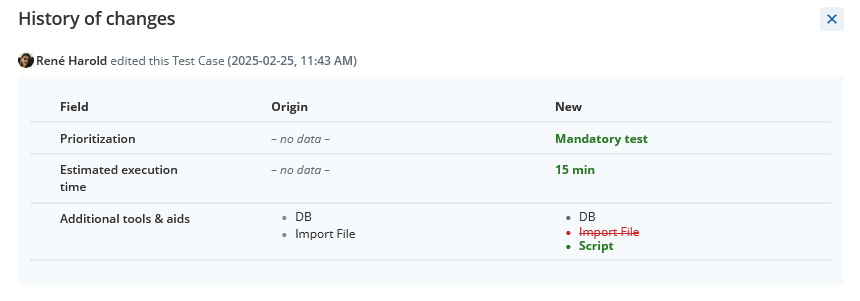
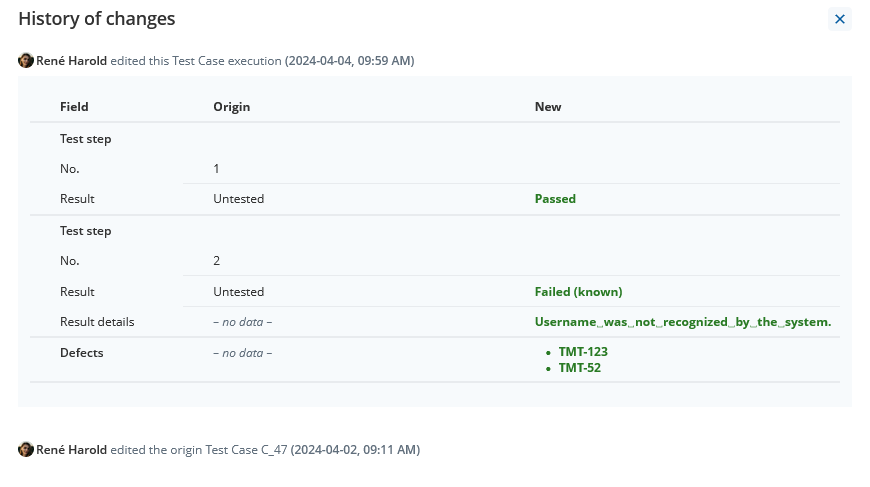
History
The history of every Test Case can be accessed through the ![]() icon in the toolbar of the Test Case. It includes every change the Test Case underwent in chronological order, starting with the creation.
icon in the toolbar of the Test Case. It includes every change the Test Case underwent in chronological order, starting with the creation.
Every entry in the History contains the corresponding metadata, e.g. the user who triggered the entry by creating or editing a Test Case, the exact date, time, and version number.
Every time a Test Case is edited, the original, as well as the new content, is saved for every changed field. To make the changes more obvious, colors are used to supplement the Test Case history. Green entries stand for new additions, red entries stand for deleted passages.
Tags
Tags can be any string and can be used to categorize different Test Cases of Test Suites. They are separated by the space key, a comma or a semicolon.
In the “Risk-basted testing” section they are used to classify Test Cases for possible regression testing.
In the search results or the Smart-Select function, it is possible to filter by these tags, providing a quick overview of, for example, Test Cases across all Test Suites of the (Sub)Project.
There are several limits for tags:
- no whitespaces
- minimum number of characters: 1
- maximum number of characters: 30
- not case-sensitive
- no limit of tags that can be added per Test Case
In order to support consistency, added tags are saved for the whole Project and all Subprojects and can be assigned to multiple Test Cases.
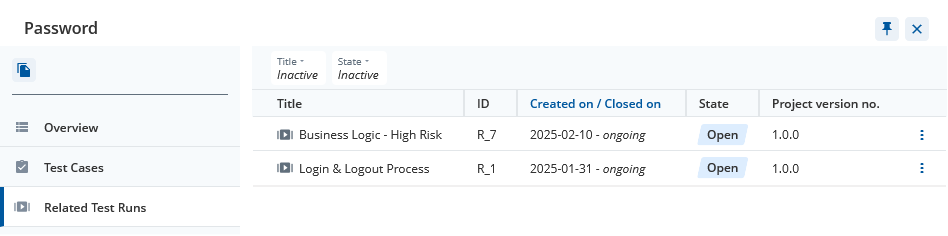
Related Test Runs
The “Related Test Runs” section lists all Test Runs the Test Suite is part of. A Test Run can be selected to navigate directly to it.
Test Runs
The Test Run enables the execution of the Test Cases. Test Runs are customizable collections of Test Cases associated with their respective Test Suites. Users can select multiple Test Suites and choose the Test Cases to execute together within a Test Run.
A new Test Run must be created for each execution. If you want to re-execute the same set of Test Cases again, you can do so by copying the Test Run.
Click on the ![]() icon in the sidebar to open a list of all Test Runs of the currently selected Version.
icon in the sidebar to open a list of all Test Runs of the currently selected Version.
There is information about the Test Runs states, as well as the relative percentage of how many Test Cases are or have been executed and detailed information about the test results.

The following functions are available in the overview.
Toolbar:
- + Test Run: Create a new Test Run.
- bulk operation: Edit tester assignment all at once.
- filter: Access the filter mask to filter the Test Runs.
For each Test Run, at the end of the row and context menu:
- edit: Open the Test Run overview in edit mode.
- open in new tab: Open the Test Run in a new tab.
- pin Test Run: Pin the Test Run for later use through the pin board.
- generate report: Create a PDF file with information about the Test Run.
- copy: Copy the Test Run without any result or result detail.
- delete: Delete the Test Run from the Version.
The context menu opens either by clicking on the three dots at the end of the line or by right-clicking on the line of the corresponding Test Run. Only empty Test Runs that contain no Test Suite can be deleted.
In the sidebar of the open Test Run, the “Create report” button and the copy icon are available, as well as the following four sections:
- Overview: Information about the Test Run and the content.
- Test selection: Overview of all Test Suites assigned to the Test Run and the number of Test Cases they contain. Test execution is possible from this view.
- Test scope: Overview of all Test Cases assigned to the Test Run, including information on risk and results, for example.
- Result map: Results diagram for visualizing the execution status of all Test Cases in a Test Run and their hierarchical structure.
- Risk-Burndown: A visual visualization of test progress with total & remaining overall risk
Create & Edit
In the Test Run list, you can create a new Test Run using the \“+ Test Run\” button in the toolbar. The title of the Test Run is mandatory, the description and configuration are optional. A new Test Run is in the State \“open\” by default.
In addition, you can create a Test Run by clicking the “Create Test Run” button in the search results list for Test Cases or in the Test Suite view. The title and description are filled in automatically.
As long as a Test Run is not closed, it can be edited at any time. After clicking on the “Edit” button in the toolbar in the “Overview” section, input fields can be edited, attachments added, or the status of the Test Run changed.
Assign Testers
Testers can either be assigned to a specific Test Case or they can be assigned to multiple Test Cases, Test Suites, or even to whole Test Runs. When assigning a tester, an email will be sent automatically to the corresponding user. Only users that have access rights in the current Project can be assigned.
Tester assignment for one or more objects can be done via ![]() bulk operations in all sections. A message in the upper right-hand corner provides information about the status of the background process.
bulk operations in all sections. A message in the upper right-hand corner provides information about the status of the background process.
When a tester is assigned to a Test Run, all Test Cases contained therein are automatically assigned to them. If some Test Cases are already assigned to other people, a message appears with the options to keep the existing tester or replace them. To quickly add testers to Test Cases from different Test Suites within a Test Run, use the feature in the “Test scope” section.
During the test, it is also possible to select or change a tester.
Smart-Select
The “Smart-Select” feature allows to automatically select or deselect Test Cases that fit certain characteristics.
In the “Test Suite selection” section, it is possible to execute this function either for Test Cases in all Test Suites of the currently selected Version or only the Test Suites that are already added to the Test Run. Furthermore, it is possible to decide whether the Test Case must match all specified values or only one of them.
Clicking the “Select matches” button adds all corresponding Test Cases to the Test Run. Clicking the “Deselect matches” button removes all corresponding Test Cases from the Test Run.
A message in the upper right corner provides information about the status of the background process.
By clicking on the “Undo” button, it is possible to undo the changes. This option is available until the next manual change is made or until the page is left.
Test Case in Run
Test Cases in a Test Run are read-only copies of the Test Cases in the Test Suites menu. The detailed views differ in a few things.
The name of the Test Case, the ID, the tags, and the “Description,” “Precondition,” and “Test steps” sections are taken from the Test Case. In the Test Run view, the “Result” column supplemented the table of test steps.
The ID in the run, the tester, and the “Attachments” and “Overall test result” sections are specific to the Test Run. The path of the Test Case in Run is displayed above the toolbar.
The following functions are available in the view:
Toolbar:
- execute test: Open the Test Case in Run in execution mode.
- print: Create a PDF file with information about the Test Case in Run.
- history: Change to the Test Case in Run in chronological order.
- show original: Open the original Test Case on the right.
In the “Show original” view, adjustments can be made using the “Edit” button. The derived Test Case in the Test Run is updated automatically.
Bug Intelligence Assistant
This feature is not available for all license options.
The IT administration can enable or disable the use of this AI feature for each (Sub-)Project individually.
This is a support feature that summarizes previous defect tickets, so that the user is made aware of potentially critical areas of a Test Case. After clicking the button and a short loading period, an overview is displayed to the Test Case in Run view. This overview consists of a list of defects and a summary of their contents.
Summary
The summary provides a short impression of the previously found defects and the most important information. If the AI function is disabled, a notification message will appear instead of the summary.
Defect list
The defect list displays all tickets linked in the “Defects” field of Test Cases in Run that are associated with the original Test Case across all Versions. The ticket number, priority, title, and the Version in which the ticket was linked are shown. If a ticket is linked in different Versions, the latest Version is displayed in the table.
Overview
After selecting a Test Run, the “Overview” section opens. All stored information, as well as the related attachments and metadata, are displayed.
The “Test results” section only appears after at least one Test Case has been assigned. A pie chart reflects the results of all included Test Cases. A further, more detailed graph is available in the “Result map” section.
As soon as testing begins, it is recommended to set the status to “In progress”. Setting the status freezes the risk values of the Test Cases, which are then used for the risk burndown chart. After the test has been completed, it is advisable to set the status to “Closed.”
A background process is started for each status change. However, the process can only be executed if no Test Case is being performed and is therefore locked. If Test Cases are locked, the user receives a corresponding message and can choose whether to cancel the process or start it and put it in wait mode. In wait mode, the process starts automatically as soon as all Test Cases are unlocked.
The following functions are available in the view.
Toolbar:
- edit: Open the Test Run overview in edit mode.
Test Selection
The “Test selection” section presents a list of all Test Suites which are currently selected for the Test Run. This includes information about how many of the total Test Cases were selected for the run, as well as the priority of the respective Test Suite. If the Test Run has just been created, this list will be empty.
The following functions are available in the view:
Toolbar:
- + Test Suite: Add multiply the Test Suites of the currently selected Version.
- smart-Select: Automatic selection and deselection of Test Cases based on certain criteria.
- arrange: Adjust the order of the Test Suites.
- bulk operation:: Edit tester assignment all at once.
For each selected Test Suite, at the end of the row and context menu:
- manage: Open the Test Case selection in edit mode.
- open in new tab: Open the Test Suite in a new tab.
- show details: Show the “Overview” section of the Test Suite.
- edit for Test Run: Allow to make changes to the Test Suite details that only apply to the Test Run.
- remove from Test Run: Remove the Test Suite, including all related Test Cases, from the Test Run.
The context menu opens either by clicking on the three dots at the end of the line or by right-clicking on the line of the corresponding Test Suite.
Test Suite Selection
When clicking on the “+ Test Suite” button in the toolbar in the “Test selection” section, a list of all available (and currently not selected) Test Suites of the (Sub)Project are displayed.
Select the Test Suites whose Test Cases are to be executed. After adding a Test Suite, none of its Test Cases will be part of the Test Run by default. The following functions are available in the view.
Toolbar:
- search: Filter the list for a searched term.
- filter: Access the filter mask to filter the Test Suite list
Test Case Selection
Select the Test Suite to see the Test Cases that are already added to the Test Run. This overview shows the Test Case title, ID in Run, ID, assigned tester and assignee, tags, the test result and linked defects.
The following functions are available in the view:
Toolbar:
- manage: Open the test selection in edit mode. The “Smart-Select” function is available.
- bulk operation: Edit tester assignment and overall test result all at once.
- expand/collapse: Collapse or expand all folders.
For each selected Test Case, at the end of the row and context menu:
- execute Test: Open the Test Case in Run in execution mode.
- open in new tab: Open the Test Case in a new tab.
- pin Test Case in Run: Pin the Test Case in Run for later use through the pin board.
- print: Create a PDF file with information about the Test Case in Run.
To add or remove certain Folders or Test Cases, click on the “Manage” button and select or deselect the branches of the tree which shall be included or excluded. A Test Case can be selected to view its details .
Test Scope
In the “Test scope” section, all added Test Cases of the Test Run are shown in a flat list. This provides a quick overview of the Test Cases with and without assigned testers, test results, risk assessment and any defects (tickets) that may have been noted.
The following functions are available in the view:
Toolbar:
- bulk operation:: Edit tester assignment and overall test result all at once.
- filter: Access the filter mask to filter the Test Suite list.
For each selected Test Case, at the end of the row and context menu:
- execute Test: Open the Test Case in Run in execution mode.
- open in new tab: Open the Test Case in a new tab.
- pin Test Case in Run: Pin the Test Case in Run for later use through the pin board.
- print: Create a PDF file with information about the Test Case in Run.
To prevent concurrent working, some functions may be temporarily locked.
Test Execution
After the test execution has started, the Test Case is in edit mode and is locked for other users. If a defect or result details were added, the overall result must not be set to “Untested”. Optionally, a result can also be selected for each individual test step. It is not necessary to maintain test step results to set the Overall result.
Use the ![]() button on the right-hand side of each step to mark them as passed with a single click. A custom result can be entered with a click on the
button on the right-hand side of each step to mark them as passed with a single click. A custom result can be entered with a click on the ![]() button next to the prior one. When a custom result is attached, an information icon will appear next to the test step result, showing the content by hovering over it. Thus, errors can be located very quickly, and they can be backed by useful information, e.g. the error message.
button next to the prior one. When a custom result is attached, an information icon will appear next to the test step result, showing the content by hovering over it. Thus, errors can be located very quickly, and they can be backed by useful information, e.g. the error message.
In case of any errors or other noteworthy incidents appeared during the execution, there are two more input fields to document defects and result details.
In the “Attachments” section, you can add screenshots or log files to the Test Case, for example. Further information can be found in the chapter “Attachments”.
The editing mode is closed by clicking on one of the buttons “Cancel”, ‘Save’ or “Save and Next”. With “Save and Next”, the changes are saved and – unless it is the last entry – the next Test Case is opened for editing.
Test Execution History
Similar to the Test Case history, there is a history for Test Cases in Runs. It lists all edits of the test execution, as well as all edits of the original Test Case, giving information about whether the last execution has happened in the most actual state. After closing the Test Run, no further changes to the Test Case are documented.
Result map
The result diagram shows all Test Suites, folders, subfolders and Test Cases included in the Test Run, as well as the overall progress of the execution.
The various test results are divided into four different execution statuses.
| Execution status | Test result |
|---|---|
| Untested | Untested |
| Passed | Passed |
| In Execution | In Progress, On Hold (internal), On Hold (external), Retest, Blocked, Customer, Skipped |
| Failed | Failed (known), Failed (new) |
A pie chart showing the overall progress and the four execution statuses is displayed in the center. The selected Test Suites initially start from this central point. This is followed by folders with any subfolders, if available, and finally the selected Test Cases.
When the mouse pointer is moved over a point, information about the type (Test Suite, folder, or Test Case in the run) appears with the name and ID. Furthermore, an animation appears to illustrate the direct connection between the connected points. Points can be moved to another position using drag and drop. The mouse wheel can be used to zoom in or out of the diagram.
Risk Burndown
In the risk burndown chart, the total and remaining overall risk is displayed on the y-axis against the (executed and remaining) Test Cases on the x-axis.
The x-axis is divided into two parts.
- A left part displaying the executed Test Cases and
- A right part displaying the remaining Test Cases (= not yet executed).
The various test results are divided into two statuses.
| Status | Test result |
|---|---|
| Executed Test Cases | Passed, Failed (new), Failed (known) |
| Remaining Test Cases | Untested, In Progress, On Hold (internal), On Hold (external), Retest, Blocked, Customer, Skipped |
To display the cumulative total risk value, the risk values are frozen as soon as the Test Run has the status “In progress”. After this point, any changes of the risk values of the Test Cases in the run will no longer be taken into account for this Test Run. Test Cases with an undefined risk are included with a risk value of 0.
Create Report
Information about “Create Report” from 1:00
Q12-TMT provides reports for Test Runs. To create a report, select a Test Run and click on the \“Generate Report\” button.
This function will create a PDF that contains the name, state, and description of the Test Run, as well as a list of all included Test Cases alongside their IDs and results. It incorporates the absolute amount of executed Test Cases, as well as the corresponding relative percentage.
When generating a report, an info wizard will appear, notifying the user that the report is currently generating. When the generation is done, the report can be downloaded.
Reports are available in German and English language. The language can be set with further access rights in the system configuration. Please have a look into the Administration Guide to do so.
My Tasks
If a user is assigned to a Test Case, Q12-TMT automatically sends an email. The assignment can be done as “Assignee” in a Test Case in the Test Suite or as “Tester” in the Test Case in a Test Run. The number of assigned objects is displayed next to the “My Task” icon in the sidebar. Only Test Cases without a final status are considered.
The overview with two categories opens by clicking on the My Task icon ![]() in the sidebar. The tasks are categorized by type. The number of Test Cases assigned to a category is displayed below the button. The category is disabled if no Test Case is assigned to it.
in the sidebar. The tasks are categorized by type. The number of Test Cases assigned to a category is displayed below the button. The category is disabled if no Test Case is assigned to it.
After selecting a category, a list of all Test Cases of that type assigned to the user appears. Clicking on a line opens the object in view mode. The following functions are available in this overview.
Context menu “Assignee of Test Cases”:
- edit Test Case: Open the Test Case in edit mode.
- open in new tab: Open the Test Case in a new tab.
- pin Test Case: Pin the Test Case for later use through the pin board.
Context menu “Tester of Test Cases”:
- execute test: Open the Test Case selection in execution mode.
- open in new tab: Open the Test Case in Run in a new tab.
- pin Test Case in Run: Pin the Test Case in Run for later use through the pin board.
- print: Create a PDF file with information about the Test Case in Run.
Risk-Based Testing
This feature is not available for all license plans.
Q12-TMT offers a structured approach to optimizing testing efforts with its risk-based testing function. Risk values are determined on the basis of manual input and automated algorithms, which are used to select and prioritize specific Test Cases.
Clicking on the risk icon ![]() in the sidebar opens the “Risk-based testing” menu and the risk heatmap.
in the sidebar opens the “Risk-based testing” menu and the risk heatmap.
The display is divided into four risk categories
General
The risks associated with the categories “Test History” and “Release Scope” cannot be fully determined unless a ticket system, e.g. Atlassian Jira or Azure DevOps, is integrated.
The different risk levels are displayed in a pie chart for the views “Business Logic”, “Test History” and “Release Scope”. The size of the segments is proportional to the number of Test Cases in the respective level.
Additional details are displayed in a tooltip when the mouse is moved over the segments. Two buttons appear in the tooltip. Clicking on the “Show Test Cases” button opens a list of Test Cases for the corresponding risk level. Clicking on the “Create Run” button creates a Test Run with the Test Cases for the corresponding risk level.
The legend on the top right lists the percentage and number of Test Cases in each risk level. The “Executed & included in Test Run(s)” section shows the number of Test Cases executed among those which are part of a Run. Test Cases are grouped by risk level. Clicking on a line in the legend opens a list of Test Cases for the corresponding risk level.
The following functions are available in this view:
Toolbar:
- create run: Create a Test Run with all listed Test Cases. The title of the Test Run is filled automatically and contains the corresponding risk level.
Context menu:
- edit: Open the edit mode of the Test Case in split view with the current table.
- open in new tab: Open the Test Case in a new tab.
- pin Test Case: Pin the Test Case for later use through the pin board.
The context menu opens either by clicking on the three dots at the end of the line or by right-clicking on the corresponding line.
Heatmap
The heatmap is a combination of all other levels. The risk displayed in the heatmap corresponds to the average of the risk assessments of the Test Case on all other levels.
The diagram shows the risk scores of the Test Cases for each Test Suite. When moving the mouse over or highlighting via the keyboard, the corresponding Test Suite, the number of Test Cases per risk level, and the total number of Test Cases involved are displayed.

Business Logic
Q12-TMT assesses the risk by considering the likelihood of an error occurring in the current Test Case, as well as the impact an error would have.
Three parts are available for each segment of the pie chart:
- outermost part: amount of Test Cases that are not included in any Test Run in the currently selected Version
- middle part: amount of Test Cases that are included in any Test Run (open, in progress or closed) in the currently selected Version and are not executed
- innermost part: amount of Test Cases that are included in any Test Run (open, in progress or closed) in the currently selected Version and are executed (i.e., with status “Passed”, “Failed (new)” or “Failed (known)”
When hovering over the fields of the pie chart, Q12-TMT will list all combinations of likelihood and impact that fit in the corresponding risk level and the number of Test Cases that belong to each combination respectively (bottom right). The smaller number on the top right is the Business logic risk numerical value which is used to calculate the overall risk.
Required input
- Test Case: “Risk” section, value for “Likelihood”
- Test Case: “Risk” section, value for “Impact”
For automatically calculated values for “Likelihood” and “Impact”:
- Stored keywords in the project settings (only for the project admin)
- Keywords should be used in the Test Case title or (sub)folder title
- Test Case: Value for “Prioritization”
Test History
Q12-TMT assesses the risk of a Test Case based on its execution History. This includes the frequency and severity of failed executions in the past across all Versions.
The average severity of those failures is estimated by analyzing the priority of the linked defects (Tickets) of all previous executions. Q12-TMT determines the error frequency by analyzing failed executions (results “Failed (new)” and “Failed (known)”) in comparison to the total number of executions in all Versions including the currently selected Version.
Three parts are available for each segment of the pie chart:
- outermost part: amount of Test Cases that are not included in any Test Run in the currently selected Version
- middle part: amount of Test Cases that are included in any Test Run (open, in progress or closed) in the currently selected Version and are not executed
- innermost part: amount of Test Cases that are included in any Test Run (open, in progress or closed) in the currently selected Version and are executed (i.e. with status “Passed”, “Failed (new)” or “Failed (known)”
When hovering over the fields of the pie chart, Q12-TMT will list all combinations of frequency and severity that fit in the corresponding “Risk” section (top right) and the amount of Test Cases that belong to each combination respectively (bottom right).
Required input
- Execution of a Test Case in a Test Run (across versions)
If a ticket system is integrated:
- Test Run: “Overall test result” section, field “Defects”
- ticket field “Priority”
Release Scope
The release scope assesses risks by analyzing the software release that is under test. This is achieved by assessing linked source or defect tickets.
In the case of source tickets, the release version specified in the currently selected Version project details is compared with the fix version of linked tickets. If the versions match, the Test Case is a feature test. Feature tests are treated with high or medium risk, depending on the priority of the source ticket.
If the Test Case has defects that are linked in an open or closed Test Run, Q12-TMT will treat it as a defect retest with risk assessment reaching from high to low.
If a tag exists in a Test Case that also exists in a feature test or defect retest, the Test Case becomes automatically part of a regression test.
For every other Test Case that doesn't fit one of the above criteria, the risk is either undefined in the case of enabled version delta, or Q12-TMT assigns it a low risk in the case of disabled version delta.
Required input
If a ticket system is integrated:
- in Test Case: “Sources” section, field “Tickets”
- in Test Run: “Overall test result” section, field “Defects”
- in Test Case: “Criteria” section, field “Tags”
- ticket field “Priority”
- ticket field “Fix Version”
Test automation
Clicking on the test automation icon ![]() in the sidebar opens the “Test Automation” menu.
in the sidebar opens the “Test Automation” menu.
Pie chart
The different automation statuses are displayed in a pie chart. The size of the segments is proportional to the number of Test Cases in the respective automation status. Additional details are displayed in a tooltip when the mouse is moved over the segments. Two buttons appear in the tooltip. Clicking on the “Show Test Cases” button opens a list of Test Cases for the corresponding automation status. Clicking on the “Create Run” button creates a Test Run with the Test Cases for the corresponding automation status.
Legend
The legend on the top right lists the percentage and number of Test Cases in each automation status. Clicking on a line in the legend opens a list of Test Cases for the corresponding automation status.
Test Case table
The following functions are available in this view: Toolbar:
- create run: Create a Test Run with all listed Test Cases. The title of the Test Run is filled automatically and contains the corresponding automation status.
Filter bar:
- Status: Narrow down the listing to the selected Test Case statuses.
- Assignee: Narrow down the listing to the selected assignee.
Versions
Q12-TMT enhances software lifecycle testing with semantic and parallel versioning, ensuring conflict-free testing across multiple Versions. It tracks Test Case history, providing full visibility into past results and progress.
An own Q12-TMT Version can be created for each software release. When creating a new Version all Test Suites (incl. Test Case Tree) are copied from the derived Version. The assignee is kept. Test Runs are not copied.
All existing Versions (open and closed) are displayed in an overview for the (Sub)Project. This overview is available in the project structure (My Projects) and in the open (Sub)Project.
| project structure | After selecting a (Sub)Project |
|---|---|
| Open the Version overview by right-clicking a (Sub)Project in the project structure and selecting the version icon | Click on the Version icon in the sidebar to open the Version overview. In this overview only another Version can be selected. |
New Versions can only be created with further access rights. Please have a look into the Administration documentation to do so.
Create a new Version
To create a new Version, the plus button next to the Version from which a new Version is to be created must be clicked. Afterward a version number must be selected from the dropdown and a title must be entered. Additionally, key points, a description, release versions and attachments can be added.
To determine the risk values for the “Release Scope” category, the stored release version should match to the software release to be tested and should match the Fix Version maintained in the ticket system, e.g. Atlassian Jira or Azure DevOps.
Close a Version
A Version can be closed in the “Version” section in the project details and with further access rights. A notification message that the Version is being closed appears at the top of the screen and informs users in the currently selected Version. A message in the top right-hand area informs about the start and end of the background process.
Closed Versions are in read-only mode and all data (including risk value) are frozen. Closed Versions can still be used as basis for new Versions. Copying Test Cases and (sub)folders into open Versions is still possible.
Changing keywords for risk-based testing in the (Sub)Project settings have no effect on the value calculation and categorization of Test Cases in closed Versions.
Privacy & Legal Terms
The Privacy Policy and Terms & Conditions of Q12-TMT can be found in the “About” section ![]() of Q12-TMT.
of Q12-TMT.
When clicking on the button, a dropdown menu will appear. The legal notes and terms and conditions are linked at the bottom of this menu.
By default, all information is displayed in English. The language can be switched to German.